![[image] Anthony Perry, Maker, Wolverhampton](images/top_stamp.gif)
|
| HOMEPAGE EXAMPLES OF WORK TESTIMONIALS FACILITIES FOR STRING PLAYERS IDEAS FOR MAKERS FITTING LININGS TO CENTRE BOUTS CENTRE JOINT REPAIR MADDER LAKE IN OIL VARNISH CONTACT ME... |
:: Centre Joint Re-Gluing Repair ::
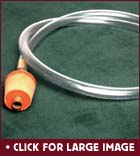
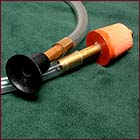
I was faced with doing a re-gluing repair as part of a restoration job. The belly's centre joint had become un-glued for about 50 mm about half way along its length. The crack was very close - almost hairline - and was only noticeable by moving the wood on each side one against the other. The defect appeared to be fresh, and I decided that only re-gluing and cleating were required. The question was - how to get glue into such a narrow crack without risking opening it up and drawing attention to the repair? I decided to improvise, and use the power of my workshop vacuum cleaner to 'suck' the glue into the joint. My vacuum cleaner is fast becoming a major tool in my workshop. As well as cleaning up after a days work, it also serves to provide suction for my varnish filtration equipment, and it operates quite efficiently a dust extraction system for my bobbin sander. I obtained a valve grinding stick from a motor vehicle parts supplier, consisting of a rubber suction cup about 32 mm diameter, attached to a length of 10 mm dowel. The dowel was discarded, and the hole where the dowel had been extended into the rubber with a 6 mm drill bit, the hole eventually coming out in the centre of the suction pad. The dowel was replaced by a short length of 10 mm diameter brass tubing.
A rubber After a successful trial run on two pieces of scrap wood loosely clamped together, the moment of truth had arrived! Other parts of the restoration had required removal of the table, so I had access to the crack from both sides. Working in a heated workshop, the table was lightly warmed on both sides with a hairdryer. Cradling the belly in my left arm, the inside uppermost, the vacuum machine was switched on and I positioned the suction pad against the underside (ie the varnished side) of the table. An assistant was invited to 'drop' a small quantity of hot, thin hide glue to the uppermost side, following the crack, the limits of which I had marked out with a pencil. The glue immediately disappeared from the surface, and was later visible around the varnish on the underside, and stuck to the suction-cup. The joint was clamped and later cleated as normal. |
| Telephone: 01902
755610 & 07976 245861 E-mail: anthony@perryviolins.co.uk |
| A member of the British Violin Making Association
and the Violin Society of America Photography by Andy Purcell | Website by Alan Benzie | © 2003 A Perry. |
 Here's a technique which could interest makers who get involved with
repairs or restoration.
Here's a technique which could interest makers who get involved with
repairs or restoration.